Token API
The first step in rendering a Conductiv Flow. You must request an access token from our API.
API
https://auth.sandbox.conductiv.co/auth
https://auth.developer.conductiv.co/auth
Create a JWT Token
The first step to getting an access token is to create your own JWT token.
Depending on what language you are using, there are a lot of ways to go about doing this.
If you are using node, the most popular package is jsonwebtoken.
If you are using Java, you could use java-jwt.
jwt.io would also be a helpful resource.
If you need help coming up with a solution that works for your system, feel free to reach out at implementation@conductiv.co.
Your JWT should have the following properties:
clientID
type: string
See integration properties for where to find this value. We define this value for you, per environment. This value is unique to your organization and should not be exposed to your users.
decisionCode
type: [string]
We have a table that shows the options and what they map to on our end:
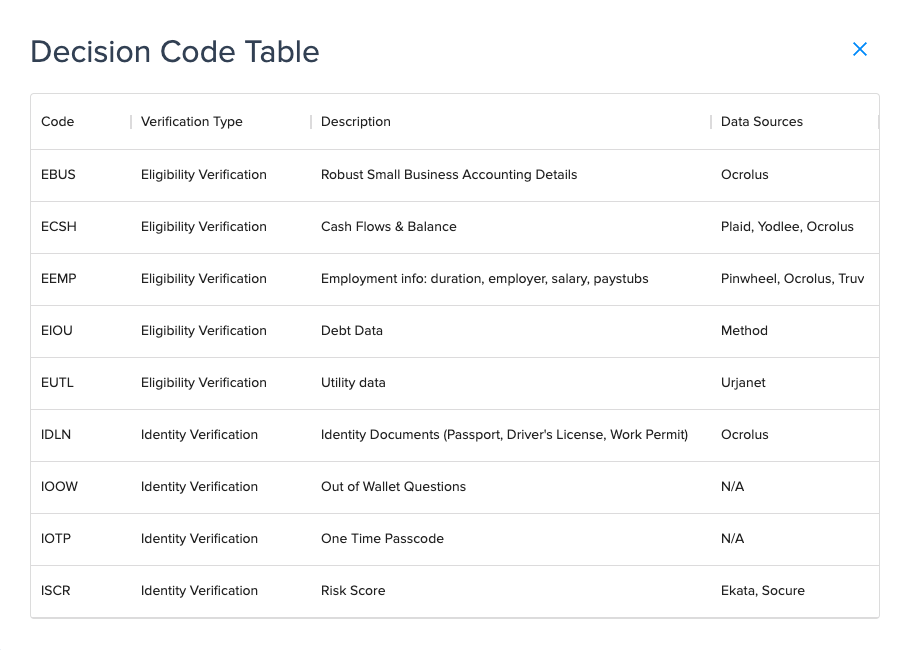
You can pass a single or multiple decision codes. These values are case-sensitive.
Additionally, if you want to include all Eligibility data sources, you can pass just E. Similarly for Identity data sources, you can pass just I.
endUserID
type: string
This is a unique value created by you, to identify the applicant. If you do not assign unique values to your clients, you may use a single unique value for this property and requestID.
productID
type: string
For each of your products on our platform, we create a corresponding ID. See integration properties for where to find this value.
If you would like to provide your own IDs, we have functionality to support that -- see products.
You can pass us either value -- your specified value or the one we have created.
requestID
type: string
This is a unique value created by you, to identify the application. Similar to endUserID, but this property will ALWAYS be unique. When you pass us decisions (via portal), this property will be the key.
iss
type: string
This should be how you refer to yourself.
tag
type: string
This is an optional property you can set to have an additional level of control over which flow appears to the applicant. See tagging for more information. This value is case insensitive.
JWT Header
{
  "alg": "HS256",
  "typ": "JWT"
}
{
  "alg": "RS256",
  "typ": "JWT"
}
Sample Payload
{
  "clientID": "Ba134r2et7w24-w7",
  "decisionCode": ["ECSH"],
  "endUserID": "702579ba-224d-11ed-861d-0242ac120002",
  "productID": "12234",
  "requestID": "3e2abc1a-27a0-11ed-a261-0242ac120002",
  "iss": "Partner Name"
}
Sign the JWT
For security purposes, you will have to sign the JWT. We do not require this step in sandbox, but do in production.
To sign the JWT, you will need to create a public/private key pair. The algorithm you will need to use is RS256 and the key size needs to be 2048 bits.
There are a lot of resources around this:
We will ask you to share your public key with us, but you should never share your private key with anyone. If necessary, you can generate a new pair of keys and upload the new public key to our platform.
In sandbox, if you have not provided a public key, you can skip this step.
In production, if you have not provided a public key, we will throw an error.
Please reach out if you need support during this process at implementation@conductiv.co.
Get an Access Token via Postman with a Signed Token
For testing purposes, you can also get a token via Postman or other similar tools. Doing this is simple; just follow these steps:
Go to jwt.io and switch the algorithm to RS256. You should see a Public and Private key pair in the "Verify Signature" section.
- If you would like to generate Public/Private key elsewhere, you can go to the key generator site listed above. Change "Key Size" to 2048 bits and "Format Scheme" to "PKCS #8", then click "Generate". Replace the auto generated Public/Private keys in jwt.io.
Upload your public key to our platform.
Go to Postman, create a new POST request to the appropriate API, go to Headers and create a new one:
- Key:
Authorization - Value:
Bearer {your token from jwt.io}
- Key:
Send the request and if successful, the API will return an access token!
If you have any questions or need support on this, please reach out to implementation@conductiv.co.
Request
Once you have the (signed) JWT, you are ready to make the request to our API. This should be done via a POST request and you will need to use your generated JWT as a bearer token.
To do this, set the value of the Authorization header of your request as:
'Bearer <YOUR_JWT>'
In sandbox, for the productID you provide in your JWT payload and the corresponding decision code, you must have at least one flow in either an APPROVED or PROMOTED state.
In production, you must have at least one flow in the LIVE state.
See workflow state diagram for more details.
Error Handling
When you make your request, we make a few checks on our end. If any of them fail, we will reject your request.
A few reasons why we may reject your request:
- Invalid property in your JWT payload
- No flows in the appropriate workflow state
- Approved for sandbox & Live for Production
- See integration properties for details on if you have flows in the appropriate workflow state